How to Turn Your Garage into a DIY Workshop

If you’re a DIY enthusiast or enjoy working on projects at home, having a dedicated workshop can greatly enhance your productivity and creativity. Your garage can be the perfect space to transform into a DIY workshop, providing ample room and accessibility. In this comprehensive guide, we will explore the steps to turn your garage into a functional and organized DIY workshop. From optimizing space to selecting the right tools and incorporating technological advancements, we’ll help you create a workshop that inspires and empowers your DIY endeavors.
- Assessing and Clearing the Space
Before setting up your DIY workshop, it’s important to assess the available space in your garage and clear out any unnecessary clutter. Consider the following:
1.1. Evaluate the Layout
Take measurements of your garage to determine the available floor space. Consider the layout of doors, windows, and electrical outlets to plan the positioning of workbenches, storage, and equipment. Ensure there is enough room for movement and safe usage of tools.
1.2. Clear Out Unnecessary Items
Remove any items in your garage that are not related to your DIY projects. Store seasonal belongings, sports equipment, or gardening tools elsewhere to free up space. Create designated storage areas for tools and materials to keep everything organized.
1.3. Enhance Lighting and Ventilation
Ensure your workshop is well-lit to provide a comfortable and safe working environment. Install additional lighting fixtures or upgrade to energy-efficient LED bulbs. Consider adding windows or skylights for natural light. Proper ventilation is also essential, especially when working with chemicals or producing dust. Install fans or consider a ventilation system to maintain fresh air circulation.
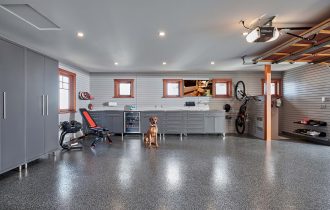
- Organizing and Storage Solutions
Efficient organization and storage solutions are crucial for a functional DIY workshop. Consider the following:
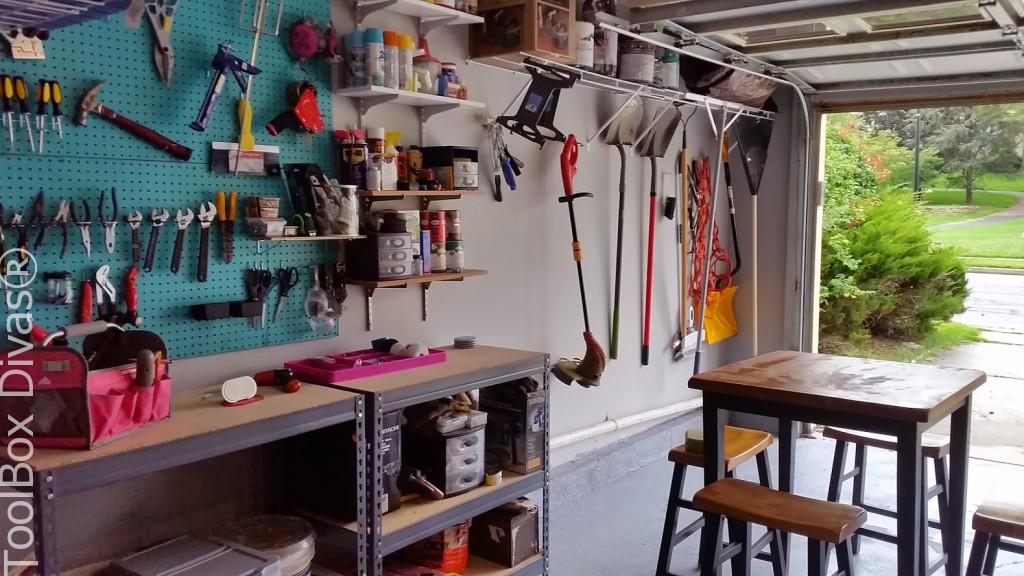
2.1. Workbench and Tool Storage
Invest in a sturdy workbench that suits your needs, whether it’s for woodworking, crafting, or general repairs. Ensure it has a solid surface and is at a comfortable height. Install wall-mounted pegboards or tool racks to keep your tools within reach and well-organized.
2.2. Shelving and Cabinets
Utilize wall-mounted shelves and cabinets to maximize vertical space for storage. These can hold materials, supplies, and containers for smaller items. Label bins and boxes to easily locate and access your materials. Consider using clear bins or transparent drawer organizers to quickly identify contents.
2.3. Mobile Tool Carts or Workstations
Integrate mobile tool carts or workstations to provide flexibility in your workshop. These carts can hold frequently used tools and can be moved around as needed. They are especially useful for larger projects that require tools in different areas of the workshop.
- Essential Tools and Equipment
Equipping your DIY workshop with the right tools is crucial for successful projects. Consider the following:
3.1. Power Tools
Invest in essential power tools based on your DIY interests and projects. These may include a drill, circular saw, jigsaw, sander, and a table saw. Research and select reputable brands that offer durability and reliability. Remember to follow safety precautions and wear appropriate protective gear when operating power tools.
3.2. Hand Tools
Have a selection of quality hand tools for more intricate tasks or situations where power tools are not required. This may include a hammer, screwdrivers, pliers, wrenches, and a set of chisels. Ensure your hand tools are well-maintained and organized for easy access.
3.3. Measuring and Layout Tools
Accuracy is crucial in DIY projects, so have a range of measuring and layout tools in your workshop. This may include a tape measure, level, combination square, marking gauge, and a set of clamps. These tools will help you achieve precise cuts, angles, and alignments.
- Integrating Technological Advancements
Incorporating technological advancements can elevate the functionality and efficiency of your DIY workshop. Consider the following:
4.1. Power Management and Outlets
Install additional electrical outlets in your workshop to accommodate the power needs of your tools and equipment. Consider a power strip or surge protector with built-in USB ports for charging electronic devices. Label outlets and organize cords to maintain a tidy workspace.
4.2. Digital Measurement Tools
Take advantage of digital measurement tools such as laser levels and digital calipers. These tools offer accuracy and convenience in measuring and layout tasks. Additionally, consider using smartphone apps that provide project planning, measurement conversions, and design assistance.
4.3. Online Resources and Community
Take advantage of online resources and communities to enhance your DIY skills and knowledge. Join forums, follow DIY blogs, and participate in social media groups to learn from experienced DIYers and share your own projects. Online platforms can also provide inspiration, project plans, and tutorials for your workshop endeavors.
Conclusion
Transforming your garage into a DIY workshop provides a dedicated space for your creative projects and allows you to pursue your passions. By assessing the space, organizing effectively, selecting the right tools, and incorporating technological advancements, you can create a functional and inspiring workshop environment. As renowned architect and designer Charles Eames once said, “The details are not the details; they make the design.” Pay attention to the details of your workshop setup and enjoy the process of bringing your DIY projects to life.